Photo by Matt Ragland on Unsplash
Dynamic Environment Switching on Android
Embrace faster developer and QA productivity
- How many times have you been asked to send a prod or staging pointed build to your quality engineering team?
How many times have you had to build and install another build to test a functionality pointing to different environments?
How many times have your Backend engineers wanted to test the functionality during the development on their local setup?
On numerous counts. Isn’t it? On every occasion, you had to start the tedious build process which will take its own sweet build time thus delaying the quality and testing turnaround time.
Not anymore! At LazyPay, we developed an in-app flow to let anyone switch their environment without requiring new builds enhancing our developer and QA productivity. This article will help you understand the path we took and guide you accordingly in creating One Build to Rule Them All for your Android apps. 🍿 ☕️
Conventional Process ✍️
In general, to support different environments, we will have a 1:1 mapping of productFlavor the environment’s host URL. For the sake of consistency and to extract the best of Kotlin, we will be talking in terms of Gradle’s Kotlin DSL for all build-related scripts. For eg. Say, our app should support two backend environments Production and Staging. This is what our build.gradle.kts looks like:
android {
  ...
  flavorDimensions.addAll(listOf("env"))
  productFlavors {
    create("prod") {
        dimension = "env"
        buildConfigField("String", "HOST_URL", "https://prod.api.com")
        buildConfigField("String", "SOME_KEY", "prod_key")
   }
    create("staging") {
        dimension = "env"
        buildConfigField("String", "HOST_URL", "https://staging.api.com")
        buildConfigField("String", "SOME_KEY", "staging_key")
    }
  }
  ...
}
When we create prodDebug and stagingDebug apps, each will be pointing to their respective environment's HOST_URL. To test a feature’s behaviour on multiple environments, we will build separate apps accordingly.
The Idea💡
On Android, when we insert any key-value pair under buildConfigField and compile the source, BuildConfig.java is auto-generated and this changes according to our buildFlavor defined values. For the example above, BuildConfig.java will look something like this for stagingDebugbuild variant:
public final class BuildConfig {
public static final boolean DEBUG = Boolean.parseBoolean("true");
public static final String APPLICATION_ID = "com.example.app";
public static final String HOST_URL="https://staging.api.com";
public static final String SOME_KEY = "staging_key";
}
If we can somehow tweak this BuildConfig.java to accommodate the configurations for all supporting buildFlavors and environments, this will solve the problem for us. Unfortunately, BuildConfig.java is generated at compile time and cannot be dynamically changed once the build process has been completed. What if we don’t have to change this dynamically and still be able to hold the configurations for different productFlavor. Let’s build on top of this idea.
Injecting build configuration 🏗
We now understand that BuildConfig.java holds all the values according to the key type defined under buildConfigField. For String key as HOST_URL, it generated public static final String HOST_URL with its subsequent value. To allow for switching environments from one build, we would like to have all the configurations(prod/staging, etc.) available under our BuildConfig.java.
Mapping Build Flavor with Configurations
We will set up all the buildFlavors and their corresponding environment configurations in a way such that the auto-generatedBuildConfig.javacontains the following:
public static final java.util.Map<String,String> PROD_MAP =
new java.util.HashMap() {{put("HOST_URL","https://prod.api.com"); put("SOME_KEY","prod_key")}};

public static final java.util.Map<String,String> STAGING_MAP =
new java.util.HashMap() {{put("HOST_URL","https://staging.api.com"); put("SOME_KEY","staging_key")}};

public static final java.util.ArrayList SET_OF_FLAVORS =
new java.util.ArrayList() {{add("prod");add("staging");}};
If we can generate the PROD_MAP and STAGING_MAPalong with a set of supported flavors, our app will have all the information available to switch the configuration at runtime. The concept is also driven by a standard code generator like KotlinPoet.
Before we do this step, we should also do housekeeping of our build.gradle.kts to move all the build configurations to one place for easy maintenance. We will create Config.kt inside the buildSrc folder for the same.
Once we have segregated the build configurations, we will now tweak our build.gradle.kts file to auto-generate the subsequent flavor map and set on BuildConfig.java.
- Under
defaultConfig, we will ensure that all our Keys are available onBuildConfigfile.
Config.keyList.forEach { key ->
buildConfigField(“String”, “KEY_$key”, “\”$key\””)
}
// This generates the keys and writes on BuildConfig
public class BuildConfig {
  public static final String KEY_HOST_URL = "HOST_URL";
  public static final String KEY_SOME_KEY = "SOME_KEY";
}
- Next, to have the configurations available for each
productFlavor, we will change ourbuild.gradle.ktsto generate<flavor>_MAPonBuildConfig.java.
applicationVariants.all {
 defaultFlavors.forEach { value ->
  buildConfigField(
  "java.util.Map<String,String>",  // type
  "${value.toUpperCase()}_MAP", // name
  variantFields(value)      // value
  )
 }
}
fun variantFields(flavor: String): String {
    val fields = variantFieldMap[flavor] // Defined in Config.kt
    val fieldsBuilder = StringBuilder("")
    fields!!.forEach { entry ->
   fieldsBuilder.append("put(\"${entry.key}\",\"${entry.value}\");")
    }
    return "new java.util.HashMap() {{$fieldsBuilder}}"
}
Since
buildConfigField) only takesStringas the value type that can be written onBuildConfig, we have provided thetypeexplicitly asjava.util.Map<String, String>and the value as the build configurations map.
This will write PROD_MAP and STAGING_MAP on BuildConfig like this:
public static final java.util.Map<String,String> PROD_MAP =
new java.util.HashMap() {{put("HOST_URL","https://prod.api.com"); put("SOME_KEY","prod_key")}};
public static final java.util.Map<String,String> STAGING_MAP =
new java.util.HashMap() {{put("HOST_URL","https://staging.api.com"); put("SOME_KEY","staging_key")}};
- Lastly, we will also write the
productFlavorsonBuildConfigwhich app will support. This will help in showing the options to the end-user in switching the environment.
applicationVariants.all {
 buildConfigField("java.util.ArrayList<String>", "SET_OF_FLAVORS", getFlavorList())
}
fun getFlavorList(): String {
    val flavorBuilder = StringBuilder()
    defaultFlavors.forEach {
        flavorBuilder.append("add(\"$it\");")
    }
    return "new java.util.ArrayList() {{$flavorBuilder}}"
}
This will write the list of flavors on BuildConfig.
public static final java.util.ArrayList<String> SET_OF_FLAVORS =
new java.util.ArrayList() {{add("prod");add("staging");}};
Once we have executed the above steps, our apps build.gradle.kts should look something like this:
To ensure the security of our app, for any buildType of
releasevariant likeprodRelease, we will not write other flavor configurations onBuildConfigand just create theRELEASE_MAP(line:13 on above GIST)
Accessing the BuildConfig 🔓
We have everything written on BuildConfig as required to develop the flow for dynamically switching environments. Let’s connect the final dots.
We will create an abstraction over BuildConfig for accessing their values. If you are using Dependency Injection via Dagger or HILT, it will help in keeping your concrete classes clean enhancing the Unit Testing. Here’s what our BuildConfigProvider will look like this:
BuildConfigProviderImpl will have the detailed implementation of all the APIs exposed via BuildConfigProvider.
Now, all we will need to do is to define a binding for BuildConfigProvider such that Dagger or HILT knows how to provide the instance of this abstraction. Once this is set up, we will be able to inject BuildConfigProvider as a dependency wherever required.
@Module
@InstallIn(SingletonComponent::class)
abstract class AppBindingModule {
 @Binds
 abstract fun provideBuildConfigProvider(buildConfigProvider: BuildConfigProviderImpl): BuildConfigProvider
}
Change Environment w.r.t Flavor 🚀
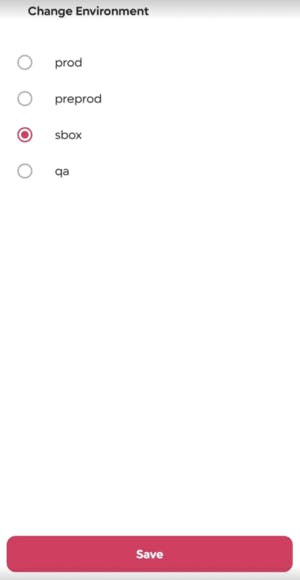
With the above implementation in place, we were able to provide the environment-switching capability right from within the LazyPay app.

LazyPay debug app showcasing supported environments. Build using Jetpack Compose ❤️
Add-On: Custom Domain Support 🚀 💯
While we have developed the environment switching feature, there is one feature missing in our implementation and that is to support custom domain configuration. This also came as huge demand from our Backend and BFF Developers as they wanted to dev test their APIs from their local setup. Keep reading to know how we built it.
Until now, we have provided support for all the environments where we have 1:1 mapping of productFlavor and its build environment(HOST_URL). We will now expand our idea to provide custom domain support.
Since only
HOST_URLwill have to change, we will fix theproductFlavorwhere other configurations remain the same and onlyHOST_URLcan be edited. We will be configuring it on ourstagingflavor.We will tweak our
BuildConfigProviderto expose the setter/getter for changing theHOST_URL.class BuildConfigProviderImpl : BuildConfigProvider { ... override fun setHostUrl(baseUrl: String) { // store in SharedPreferences } override fun getHostUrl(): String { val baseUrl = // get from SharedPreferences else return empty return baseUrl ?: getValue(BuildConfig.KEY_CS_JAVA_URL) } }Unfortunately, the app will start throwing the below error when the domain is changed.
java.net.UnknownServiceException: CLEARTEXT communication to <custom_domain> not permitted by network security policySolving java.net.UnknownServiceException: As all our
productFlavorwith theHOST_URLlikehttps://prod.api.comwill go via secure connections,[clearTextTrafficPermitted](https://developer.android.com/training/articles/security-config#CleartextTrafficPermitted)is always set tofalseby default. This will avoid fraudulent and insecure connections to our app. But, custom domain setup will require us to tweak the[network-security-config](https://developer.android.com/training/articles/security-config)to allow for insecure connections. We will create separatenetwork-security-configfiles for differentbuildType. Ourdebugvariants will allow for[clearTextTrafficPermitted](https://developer.android.com/training/articles/security-config#CleartextTrafficPermitted)while the release won’t.// Create debug folder and place network-security-config under there <network-security-config> <base-config cleartextTrafficPermitted="true"/> <debug-overrides> <trust-anchors> <certificates src="system" /> <certificates src="user" /> </trust-anchors> </debug-overrides> </network-security-config>
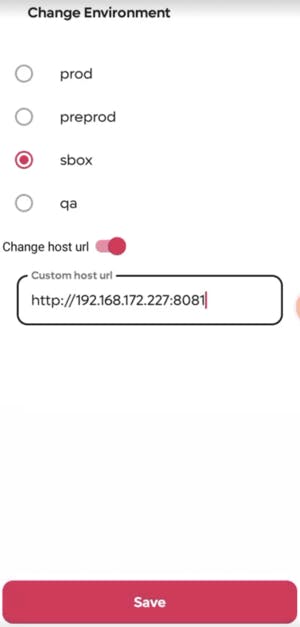
At LazyPay, we provided custom domain support on our sbox environment like this.

LazyPay debug app showcasing custom domain support. Build using Jetpack Compose ❤️
Once a user attempts to switch the domain/environment on app, it is recommended to clear any app cache restarting the app as a fresh launch.
Add-On: Obfuscation on Release Variant 🚀 💯
If we like to have the above feature built on a variant where obfuscation and minification run via Proguard typically release variant, our apps will crash due to code obfuscation. To fix this, we will add the following rule on proguard-rules.pro:
# Not obfuscating config-maps of BuildConfig as we are accessing them via reflections
-keepclassmembers class com.citrus.citruspay.BuildConfig {
    public static final java.util.Map PROD_MAP;
    public static final java.util.Map STAGING_MAP;
}
Conclusion ✅
We have provided all our learnings in building a feature that directly enhances the developer's productivity and experience. Time saved in generating different build variants is time gained for faster development and testing cycles.
As we gear up for a new age in financial technology, we are also striving hard to prepare our apps built for India scale following Modern Android Development, writing UI in Jetpack Compose, Unit Tests, and much more. At LazyPay, we are working every day to improve not only our products but also excel in terms of how we engineer them for scale. If this excites you, come join our Experience Engineering team at PayU Credit. We are hiring across all domains.
PS: Next blog will talk about how our iOS engineering team developed a similar feature to improve their productivity. Stay tuned. 🙌

